| SUBJECT: |
| NEW FAMIS SCREEN FOR WORKER GENERATED VERIFICATION FORMS |
| DISCUSSION: |
| Effective immediately, the Request for
Information documents, which until recently were generated by FAMIS, must
be generated by staff. These forms can be generated any time verification
is requested from the eligibility unit or a third party. Staff may
access these documents from the Verification Forms List (FM4B). The
intent of this process is for staff to generate and print necessary documents
during the interactive interview. When generated during the interview
process, staff can obtain the necessary signatures so the information can
be released to the agency. This memorandum describes the necessary
steps for editing and generating documents.
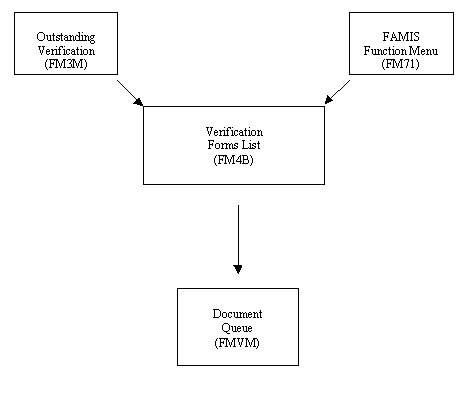
COUNTY RESPONSIBILITY Staff is expected to use the available FAMIS documents for applications, recertifications and budget adjustments. Rely on hard copy forms from your county supply only when the FAMIS system is unavailable. Staff must select the document to be created from the Verification Forms List screen, (FM4B,) generate the document, and mail it from their county. HOW TO ACCESS THE VERIFICATION FORMS LIST During the Controlled Flow, when Technical and/or Income Eligibility outcomes are in a PEND on the Supercase Eligibility Unit Summary (FM30,) flowing forward takes the user to the Outstanding Verification screen (FM3M/OUTVERF). Press F20 to access the Verification Forms List (FM4B). The Verification Forms list may also be accessed from the FAMIS Functions Menu (FM71/FUNCTMNU). Go to FMPX; select option 1(FAMIS Functions Menu) and press enter, select option 6 (Verification Forms List) and press enter.
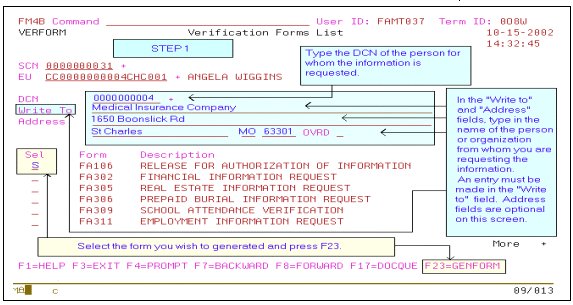
FM4B: VERIFICATION FORMS LIST (VERFORM) This screen lists all of the documents that can be used to obtain verification of factors necessary to determine eligibility. You must generate the document and proceed to Document Queue in order to edit and/or print it. The FA-106 is the example used to show how to enter text on a notice. The steps outlined in the memorandum are navigational tools used for all forms on the Verification Forms List. STEP 1: To generate a document, on the Verification Forms List screen, complete the DCN and "Write to" fields, "S"elect the form you wish to generate and press F23. The DCN field should contain the DCN of the person whose information you are requesting. You may enter this DCN or prompt to select from members of the supercase. If the DCN field is not populated, the name of the person whose information you are requesting does not appears on the generated notice. When entering the "Write to" information, remember that all addresses must be Code-1 Plus compliant.
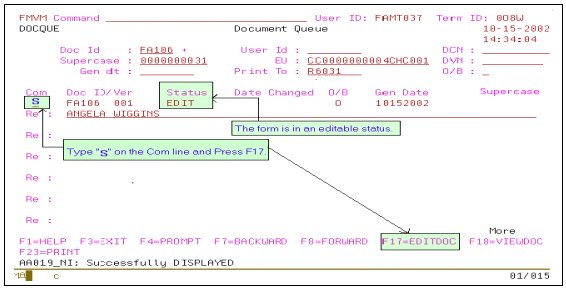
After the form generates, the acceptance message appears and the "Write to" information no longer appears. The acceptance message is "Form generated successfully, Use DOCQUE to edit and print the form". Step 2: Select the generated form and press F17 to access DOCQUE.
Step 3: Edit the form by typing and "S" on the Com line and press F17 to edit the form.
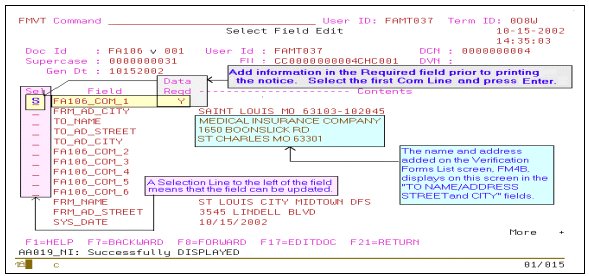
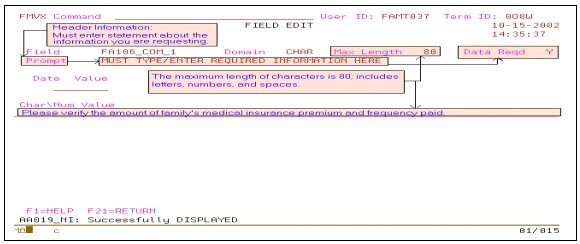
STEP 4: The editable document shown in the example
has required and optional data fields.
Select the first Com line and press Enter, to add information in the Data Required field. The "Write to" name and address lines may be updated, if necessary. All addresses must pass Code 1 Plus.
The "Char\Num Value" text entry field on the FA-106 is limited to eighty (80) characters and spaces. Ensure that language and sentence structure is appropriate and accurate prior to pressing the Enter key. Once the information is successfully added, press F21 to return to the Select Field Edit screen, FMVT.
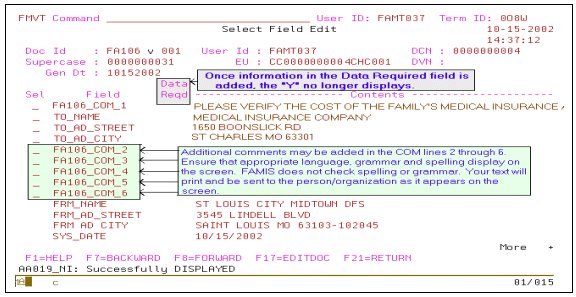
Step 5: When you return to the Select Field Edit screen (FMVT,) the added text displays. Only the first 56 spaces used to add text is viewable on this screen. Once the information is added to the "Char\Num Value" field and you have returned to the Select Field Edit screen, the "Y" no longer displays. You may add additional text on Comment lines 2 through 6.
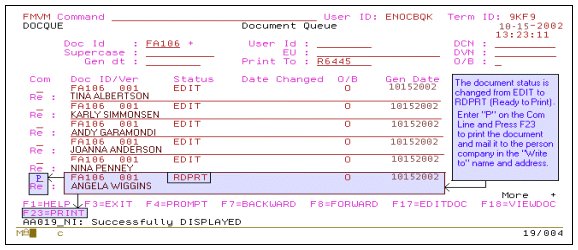
STEP 6: Once the editing is completed, Press "F21" to return to Document Queue and print the document by entering a "P" next to the document and pressing "F23". Have the document signed by the person for whom information is requested. Mail the document to the person or organization in the "Write to" field.
|
| NECESSARY ACTION: |
|